Showing posts with label Millinery. Show all posts

Saturday, February 22, 2014

Creating a Top Hat Without a Top Hat Block (continued)

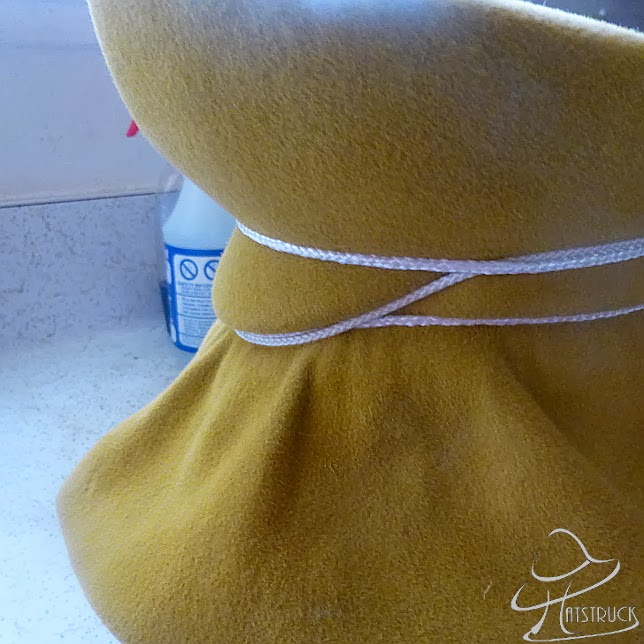
Continuing with my little top hat project from my last post, it has been a wonderful journey.  Because I didn't have a top hat block, I figured out a simple way to flare the tip (top) of the hat without such a block.  So the next challenge was to taper the crown down to the smaller head size, and also to create a more attractive curve from the edge of the tip to the head size.  I was pleased with the outcome, and I learned a few things along the journey.  Because of what I learned, my next step will be to create a cardboard or foam transition block rather than using my protein powder can.

I can't emphasize the importance of  experimentation in order to improve one's skills.  Had I asked someone how to do this, and if they would have told me how to do it, I would have missed out on all of the things learned in-between--hits and misses--including the new applications learned that could be applied to other projects. 

Anyway, above is an improved version and to your right is the first version of my top hat; note the taper, plus I decided to flatten the tip.  The technique for tapering the sideband came from my Pinterest board, How Other Milliners and Hatters Do It, the pin on creating a Fosshape top hat.  When you think about it, Fosshape has some of the same properties as felt, it's a non-woven material that stretches under steam and heat, etc., (1. non-woven material, 2. stretches under steam and heat).   So given that they share some of the same properties, it's intuitive that the sideband of the felt would be shaped in the same manner as the Fosshape top hat, correct?  Anyway, wonderful tutorial, but my tip was created in a much simpler manner.  I will be teaching how I created my flared top hat in my upcoming class on March 8, join us.  Wow, I just told you how to do it!  Pretty easy if you don't focus on how I did mine.  I can think of several other ways of doing this, and I'm sure that many of you can do much better than I did.

Forgive the lousy pictures; I'm having camera issues.

Thursday, February 20, 2014

Creating a Top Hat Without a Top Hat Block; Another Example of Hat Blocking Without Pins and Nails

Creating a Top Hat Prototype

It's almost time for my felt blocking class that will be held on March 8.  Usually, I ask students what type of hat they would like to create in class.  One of the students wrote that she wanted to make a top hat.  OK, it's panic time!  I don't have a top hat block!  The top hats that I've made have always been flat pattern buckram hats.  So I told her that I didn't have a top hat block, but that she was not to worry because I'd figure something out. Usually I think up some over kill process to solve an issue. So I had two techniques I thought about using, but I scrapped those because, as I've grown older, I prefer to do less labor intensive things, or maybe I'm just growing lazy.  I prefer to let my brain do the heavy lifting.  That process usually starts by sitting in a chair, looking out into space, and just thinking.


Now as I was sitting in my chair thinking, I started looking around the room, and there I found my solution.  A two minute solution that I've been using for decades!  I became excited and started blocking my hat and shaping the flared tip (top) until hunger set in.  When hunger sets in, everything ceases:  the sun goes down, the air is sucked out of the room, my head "jumps time;" you get the picture.  So after I had cooked and eaten, I refined my project and a flared top hat prototype was born.  Note that I could have made a flat tip.  I can't wait to teach the technique in class.  Now all I have to do is taper the size down to the small head size of the student.  Stay tuned. By-the-way, I always keep pre-used  materials to practice on.  I love continuous experimentation and learning!

Another Example of Blocking Without Pins and Nails (American Style Hat Block)

OK, for those that have been told that you will not be able to get crisp edges, etc., on blocked hat materials (felt, straw, etc.) unless you nail it down, it's probably because they either don't know how to block without pins and nails, or it's because they haven't been successful at doing it themselves.  Also, you must remember that there are more components to blocking than steaming and securing the material to the block.  Here I have a 30s/40s doll hat block (small adult hat block).  Usually, when I see some of the cap blocks they have been pinned or nailed in the area of the bill (visor) where it meats the head size.  So if the block has been used often, that area has probably been destroyed.

Anyway, here are a few images that shows how to block a cap without pins and nails.  Keep in mine that as the  style of block changes, so does the solution for blocking it without nails or pins.  You have to use your imagination before you start banging into your block.

Wednesday, April 4, 2012

Hatstruck Couture Millinery: What If First Lady Michelle Obama Occasionally Wore A Hat?

I thought it would be fun to see how First Lady Michelle Obama would possibly look if she occasionally wore a hat.  I must say, if she would adorn her lovely head with a beautiful hat, it would take nothing away from her classy style.  Not only that, could you imagine the impact she would have on the millinery trade.  Below is a video I playfully put together showing how the First Lady would look in a few of my hats.  Enjoy.

P.S.:  I'm still working on the next post (see bottom of last post); stay tuned.  Also, leave your email in the box to your right to receive notices of new Hatstruck posts sent directly to your email address.

Wednesday, August 24, 2011

Foundations for My Cocktail/Fascinator Hats: Part II, Including Blocking Suede and Other Millinery Materials

I have a nasty habit of giving things away.  I picked this up from my grandparents, two extremely generous people.  I guess this is a good thing, after all I've gotten back more than I've ever given away.  You see, back in February of 2010, I brought you Foundations for My Cocktail/Fascinator Hats and promised, I think, to post a followup showing how to put the lining in the hat.  Well, someone wanted the hat even before I finished it, so I gave it to them.  Since that time I've received a number of emails asking me how to put a lining in a fascinator.


Since I haven't had any sleep in over 24 hours, I'm asking you to forgive me in advance for my more than usual number of typos.   Please read over Foundations for My Cocktail/Fascinator Hats and I'll start where I left off, almost.  Rather than working with a stretch material I will be covering this hat with two layers of suede, one of which will have to be blocked before it is sewn to the buckram foundation.  I will also block the lining.  


I'm growing tired of wining about seeing millinery fabrics that don't hug the frames they cover.  So, I can either stop wining or do something about it.  I have to tell you that every time I see fabric that does not fit a frame correctly, I have an internal tantrum, especially when I see it in a high fashion magazine!  I'm working on this.  If you ever want to cure yourself of something like this just listen to someone else complain about something similar without helping or offering a solution.  Not so cute is it?


When I started taking millinery classes we had to steam and block everything.  We had to block the buckram, the lining, and all fabrics that were not stretch fabrics.  To your right is an image that shows suede that has not been blocked.  This does not look professional at all.


To block suede or leather, mist the inside of the fabric with water.  I use a very fine mister.  Stretch the fabric over a hat block and let it dry.  To stretch fabric that has a bias, stretch the fabric on the bias over a block and steam it, readjusting the fabric re-pinning as you steam.  It's just that simple.  See lining, below right.  I don't steam buckram anymore.  I prefer to mist it or do a very fast dip in water and work the moisture three the fabric in my hands.  This way the buckram appears to dry harder than it was originally (same as steaming it).


Using a glover's needle (leather needle) sew the suede to the frame catching only the crinoline.  The second layer of suede, the black mesh, did not have to be blocked because it automatically hugged the frame.  However, I blocked the lining.  


Note:  If you are adding trim to your hat, sew the trim on before the lining is attached, if possible.  Use your best judgement.


After the lining has dried, lay it into the crown and pin it to the suede using fine quilting pins or millinery pins (fine quilting pins are easier for suede and leather).  Stitch the lining to the suede about  1/4 th inch down from the edge of the hat.  Trim the lining; it is not necessary to turn the lining under. 
  Note:  Every layer of fabric, including hat band, diminishes or adds to the inner or outer  side of a hat.  Although turning the lining under does not affect this type of hat, it will affect a full crown hat. Remember, by turning the fabric under you will have an additional layer of fabric.   I prefer to trim the lining down rather than turn it under no matter what type of hat I'm working with.
Swirl your  grosgrain ribbon (petersham in some places, sawtooth to some), pin it to the suede (remember that the lining is 1/4 th inch down).  stich it into place.  


Additional Images


Adding support wire for feather:  Added feet to the wire and stitched them under the black suede mesh.


Feather Trim:  Feather curled in opposite direction of curve, using  my thumb's nail to pinch the spine approximately every 1/4 th of an inch.


Lining Fabric:


Lining Fabric:  Design created using my logo in graphics software and printing the fabric on my Epson printer  (fabric will have to be attached to paper before printing).


O.K., the label is a bit overkill!


Final Notes:  Please take advantage of the free online resources in the sidebar of this blog.  Also, purchase a reference book.  My first millinery book was "From the Neck Up." You can find it on the author's site, on Amazon, Ebay, etc.  I didn't go into detail as far as stitches, etc., are concerned because I really feel that if you are new to millinery, you should do some exploration and experimentation on your own.  If possible, take a class.  


If you do not have a block, purchase a wooden bowl of similar shape and block and make frames using the bowl.  


Have fun!!