Showing posts with label Millinery Classes. Show all posts

Thursday, February 20, 2014

Creating a Top Hat Without a Top Hat Block; Another Example of Hat Blocking Without Pins and Nails

Creating a Top Hat Prototype

It's almost time for my felt blocking class that will be held on March 8.  Usually, I ask students what type of hat they would like to create in class.  One of the students wrote that she wanted to make a top hat.  OK, it's panic time!  I don't have a top hat block!  The top hats that I've made have always been flat pattern buckram hats.  So I told her that I didn't have a top hat block, but that she was not to worry because I'd figure something out. Usually I think up some over kill process to solve an issue. So I had two techniques I thought about using, but I scrapped those because, as I've grown older, I prefer to do less labor intensive things, or maybe I'm just growing lazy.  I prefer to let my brain do the heavy lifting.  That process usually starts by sitting in a chair, looking out into space, and just thinking.


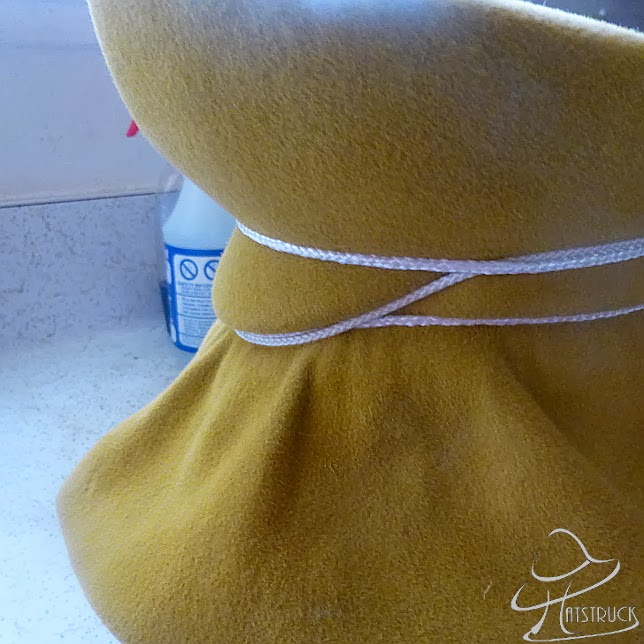
Now as I was sitting in my chair thinking, I started looking around the room, and there I found my solution.  A two minute solution that I've been using for decades!  I became excited and started blocking my hat and shaping the flared tip (top) until hunger set in.  When hunger sets in, everything ceases:  the sun goes down, the air is sucked out of the room, my head "jumps time;" you get the picture.  So after I had cooked and eaten, I refined my project and a flared top hat prototype was born.  Note that I could have made a flat tip.  I can't wait to teach the technique in class.  Now all I have to do is taper the size down to the small head size of the student.  Stay tuned. By-the-way, I always keep pre-used  materials to practice on.  I love continuous experimentation and learning!

Another Example of Blocking Without Pins and Nails (American Style Hat Block)

OK, for those that have been told that you will not be able to get crisp edges, etc., on blocked hat materials (felt, straw, etc.) unless you nail it down, it's probably because they either don't know how to block without pins and nails, or it's because they haven't been successful at doing it themselves.  Also, you must remember that there are more components to blocking than steaming and securing the material to the block.  Here I have a 30s/40s doll hat block (small adult hat block).  Usually, when I see some of the cap blocks they have been pinned or nailed in the area of the bill (visor) where it meats the head size.  So if the block has been used often, that area has probably been destroyed.

Anyway, here are a few images that shows how to block a cap without pins and nails.  Keep in mine that as the  style of block changes, so does the solution for blocking it without nails or pins.  You have to use your imagination before you start banging into your block.

Monday, September 19, 2011

Fascinator Class October 15, 2011, Los Angeles, California, Area

First, forgive me for staying away for so long.  I've been extremely busy with Ms. E', updating my Hatstruck Web site, making hats, buying hat supplies I'll never use, you name it!

The Hatstruck site contains what I refer to as my "Portfolio of Skills."  I haven't added  descriptions to the backs of the majority of the images yet, plus I need to add additional images.  However, I've decided to launch the site as is to support the announcement of the my upcoming fascinator class.  

I attended the fair and I took pictures, but I'll post those in a week or so.  I did win two first awards, and a most innovative award, including lower awards on all of my other entries.  I'll go into more detail later.

Yes, I finally decided to give a group class again.  I wanted a place close to where I live, somewhere serene, somewhere artsy.  After looking for an appropriate location, I decided on a place within walking distance from where I live here in Torrance, California.  For those traveling from out of town, Torrance is packed full of  wonderful restaurants, hotels, and shopping.  The weather in this beach city is to kill for!  Just a little bit of enticement to encourage you to travel here.

The class will be held on Saturday, October 15, 2011.  Here is a description of the class as given here in the sidebar.  For time and location, please see the sidebar to your right:

More than a simple fascinator class, this class will teach frame making and covering; millinery trim, including feather work, and more. Various demonstrations using popular millinery materials (jinsin, crinoline, sinamay, etc.) will be given in class. Learn skills that apply to all areas of couture millinery. All fascinator supplies are included in the class fee. Please bring scissors, stick pins, measuring tape, and needles.  Although you will complete a buckram frame (wiring, stitching, etc.), finished frames will be provided so that you may cover and trim an additional hat(s), depending on your skill level and time. A class fee discount applies to Hatstruck blog members--$180 members, $225 non-members). Registration fee now due. A non-refundable fee of $40 will apply should you cancel the class within eight (8) days of class start date.  For those registering from 1 to 8 days of the class and decide to cancel, the $40 non-refundable fee will also apply. Please contact me at lduncan@hatstruck.com for additional information.  Feel free to make payment through PayPal.

There is a lot packed into this class.  I was not interested in conducting a fascinator class where you just trim a fascinator base and call it a day.   So, if you want to work hard, but still have lots of fun, please join me.  Although I will demonstrate a shortlist of hand stitches in class, I suggest that you view the stitch videos suggested on links in the sidebar to your right.  Snacks will be provided.

Below is a fun, vintage millinery video; enjoy!
BIRTH OF HAT

Thursday, June 30, 2011

The Cabbage Rose Class Project, No Summer School, and Other Ramblings


Summer School Ends  Thursday, a week ago, my evening millinery class was buzzing with activity and chatter.  You see, it was the last night of class before summer vacation.  Not only was it the last night, but for the first time since I have been taking millinery classes, over a quarter of a century on and off, there would be no summer school because California budget cuts caused LAUSD  to ax our millinery classes, as well as some other summer classes.  Back when I started taking classes, summer school was a time when we would cram everything in--flower, glove, purse, and jewelry making, including shoe covering and sewing, and hat making, of course!  Oh, how I long for those summers of creativity!  These classes serve adult learners, including seniors, and high school students needing to take additional classes, usually for graduation.

Cabbage Rose Project  What was all the chatter and urgency about?  Well everyone was excited about the cabbage rose Mrs. Eloise King, our millinery teacher, was demonstrating to make on this last night.  Several of the students had made the rose earlier to trim their hat, and it was so beautiful that everyone in class wanted to make it.  This was not the only rose being taught this night, but this was the one that really peaked my interest.  Unlike the cabbage roses I had made in the past using strips of folded fabric, this rose, although it looked very similar, was constructed in a unique manner.  It was this construction technique that intrigued me.  This rose was constructed using 12 squares of fabric of varying sizes.  Each tier of the rose was a pod that fit into the pod below it, and none of the tiers were attached to the other--they floated inside each other like a flower in water.  I made a very large red flower from thin suede, not to be used as trim, but as a hat.  The suede yielded a heavier flower than I liked, but I was fascinated by the results.  Mrs.  King suggested that I turn the edges down, and the result was spectacular!
.
Why All Those Millinery Classes  You're probably asking, why is she still taking millinery classes.  Well, my calligraphy classes only lasted eight years...and then there was the paper making, the jewelry making, elementary and high school (of course these are out in order), college, college, additional technical classes, etc., etc.  To make a long story short, I'll never stop learning, and it's something I can fit into the rest of my life, for the rest of my life.  

Sharing  When my kids were small, I made hats for extra income while working my regular job.  I actually dreaded making another hat then--the deadlines, etc.  After a while, I started making hats only when I wanted to and gave them away to family and friends; boy, did I love this.  Plus, sharing was and still is a great way for me to give back.  Now retired, I love it even more.  The research and experimentation never ends!  

For those that email me and are surprised that I share so much, I ask, what is there not to share?  I know how you feel because I've seen how some act if they are asked a millinery question.  In my millinery classes we pass hat patterns around as if we were passing around tea cakes.  For years no one even thought about "copying."  Even back in the day when many of the women had millinery businesses, they never felt threatened and always shared.  Today occasionally someone will come through that will take but not give back, but that has only been within the last few years, and they don't stay very long because "they're on a mission," excluding those that stop in to further their careers.  Not everyone has the time to just hang out.  There is a difference.

I've been told that people will not respect me if I just "give it away;" people will just use me up; people will just sell the information.  To that I say, this is about me and what I enjoy doing; there are still good, honest people in the world.  I'll leave the respect to those that really know me, and I will not stop doing what I enjoy doing because of others' issues and insecurities.  Somewhere in the world someone, especially in these times, will need a little extra cash that learning millinery will bring them; someone will need a hobby that they can enjoy without spending a fortune to pursue; someone, because of their location will not have access to millinery classes or expensive millinery supplies; but many will have Web access.  It will not replace formal instruction in many cases, but it will help to a certain point, and big time if hard work goes into learning.  

Kicked Off Yahoo Answer  This leads me to another issue.  Recently I signed up for Yahoo Answer where you ask and/or answer questions on various subjects.  Of course, I searched out millinery and hat making questions and answered them when I could.  Shortly afterwards I was reported for inappropriate language and kicked off--the same language I use here on my blog.  After several emails back and forth to Yahoo (one of those everybody-gets-the-same-email, emails), it was clear that they were not going to investigate.  So, it appears that there is a problem with sharing.  The next time someone is bashing someone on the Web, ask yourself why.  I've learned so much in the last year and a half about how evil some people can be.  What a miserable waste of life.

What do you think?   What is the issue with sharing techniques that have been documents in books down through the years?  We are not talking about the Coca Cola formula here.  Unlike hatting (making men hats), millinery is not a trade that is passed down from family to family--its secrets.  Plus today, there are those that make exquisite men hats without all those guarded secrets.  This does not involve someone's line or technique they have created.  So, I'm I that much out of touch? I would really appreciate your thoughts.

Please note that there was a typo on the County Fair millinery flyer.  The delivery date is July 16, 2011 and the delivery time is from 8:00 a.m. to 5:00 p.m.

Friday, April 30, 2010

How to Make Your Own Millinery Flower Stamens

Every once in a while I'm disappointed about my ability to secure millinery-related items.  Usually I can't find a material I once used because it's not being made anymore; if I find it, it's over priced just because it's a "millinery" item (millinery is really hot now); or it's "vintage", etc.  This time I was disappointed because I purchased several separate packages of stamens from a seller on my favorite auction site; you know the one.  I emailed the seller to ask for a discount on postage, since the stamens could all be mailed in the same envelope.  I should have known better when the seller didn't email me back.  Well! I received the stamens in one package of nasty brown paper bag torn and taped together.  I would have appreciated the stamens costing more and the postage being what it should have been.  This act led me to experiment with making my own stamens.

 After experimenting with a number of things, I found that the things shown in the image to your left gave me the best results.  These included glazed hand quilting thread, acrylic paint, and fabric stiffener.  First, I rolled my flower petals and set them aside. I cut the thread into strands approximately 24 inches long, dipped them into the fabric stiffener, and then I hung them across a clothing rack to dry (do not let strands touch). The drying only takes a few minutes.  After drying, I rapped the thread around a 2 1/2- inch piece of cardboard that I used as a cutting gauge.  Next, I cut each end of the thread.  Finally, I dipped each end into the acrylic paint.


After I dipped the stamen tips, I set them aside to dry.  I used a gridded aluminum pan, but just about anything that would  allow the stamen tips to hang over without touching each other would do.

Finally, the stamens are finished.  One group of stamens on the tray below is commercially prepared; can you tell which one?  They are the stamens on the extreme left.  To the right of these are stamens that I double dipped, first in yellow paint and then in purple paint to obtain the same effect as the first group of stamens (click on the image to enlarge it.).  I used the non-gloss paint for the second dip because it is not as thick as the glossy paint.


Tips:  For a larger stamen tip, dip stamen ends several times.  The glossy paint yields a larger stamen tip because it is thicker.  Also, setting the paint aside for approximately 15 minutes before dipping will also yield a larger tip because the paint thickens the longer it is exposed to the air.

I know this is not for everyone, but for those of us that just like to make things, this will work.  Enjoy!

Monday, April 5, 2010

Images From My Last Draping Class

I can't tell you how much I enjoy teaching millinery, and when the students are as enthusiastic as those that were in my last draping class, it's an extra added bonus.

Many times a full-size hat covers too much hair.  No wonder that this is why the fascinator/cocktail hat is so popular today.  So I made this small suede and vinyl hat for class show-and-tell, thus making draping relevant to current fashions.

A student's work should always outshine her/his instructor's, and that was certainly the case in this class.  To the  right is Colleen's beautiful draped pillbox.  This image does not adequately show the intricate details in this lovely hat.


Gladys is quite an accomplished clothing designer, and it shows in her lovely little cocktail hat. 


Thanks ladies.

Tuesday, March 9, 2010

A Day of Felting and Draping!


I never miss the opportunity to take a millinery class.  I'm all about the continuous learning concept.  After over 25 years of taking classes and reading how-to books, I'm still learning.  So when I had an opportunity to taking a felting class I jumped at opportunity.   I had done a little felting in the past but I needed to upgrade my skills. Suzi Holloway of Wearable ArtRehn Dudukgian of Bijou Van Ness, and yours truly could not have had more fun than if we were six year olds playing in the sand.  The three of us actually completed our felting projects in class.


After the felting class I conducted a draping class.  I brought along two hats for show and tell--a classic 1940s-style hat and a contemporary doll hat/cap.  My goal was to demonstrate how versatile draping could be.  Suzi completed her drape, and I must say that I was quite impressed.  

Check out Suzi and Rehn at the next Downtown Fashion Walk on March 18th; I may even show up.  Don't forget to visit Rehn's Web site where you will find her beautiful couture millinery creations.  You can reach Suzi at Szholloway@aol.com.  You'll have to pick up one of Suzi's hats and fascinators at the Fashion Walk.  I even bought one of her hats at the last Walk.  I was surprised that she had hats large enough to fit my size 25 1/2 head and hair.  

By the way, that's Suzi holding the mirror, wearing one of her hats, and the cute lady looking into the mirror, also wearing a Suzi hat, is my little sister, Robin.  Thanks again to Carol Cirillo Stanley for taking this lovely image.  


Check out the purple hat that Suzi is holding.  Great job!