Showing posts with label Hat Form. Show all posts

Sunday, August 10, 2014

Another Little Competition Deadline Poke; Competition Prize Package Peak; More Buckram Form Discussion

Straw Millinery Supplies and Hat StretcherThis evening I thought I would continue the discussion from last evening:  competition deadline; continued work on my buckram top hat form for the competition I will be entering; and finally, give you a peak at another prize for this competition..

There's not too much I have to say about the competition deadline, except to remind everyone to read the rules and regulations.  My last blog post will lead you to other posts and all will keep you up to speed.  I wish all of you well.

You've seen two prizes I plan to award, a five-section hat block (the one I don't like), and a strange, vintage department store hat display. Well, here is another prize: eight capeline (cartwheel--wide brim) straws, one vintage straw hood, cello straw braid, and a hat stretcher.

Why the Hat Stretcher? 
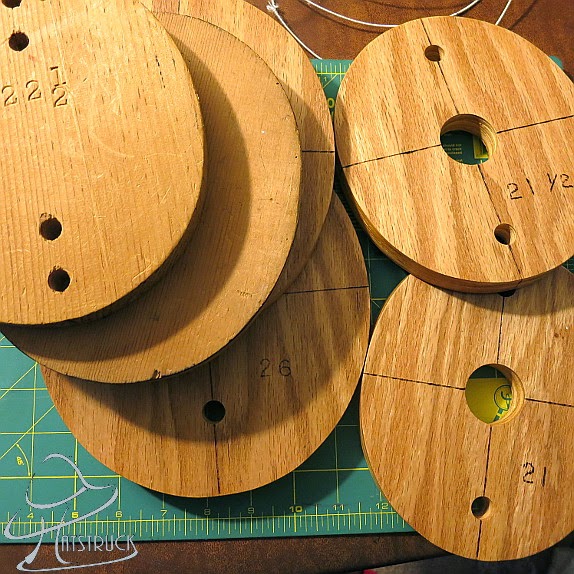
Headsize Collars/Lifts
Headsize Collars/lifts
When we measure our head size (headsize) and get a measure of,  let's say 22 1/2 inches (baby size compared to my headsize), for the purpose of making a hat, upon completion of the hat we will have added material(s), sewing thread, sweatband, etc.  Well everything we added to the inside of that hat, even the thread or a knot, takes away from the headsize of the hat.  So, the hat stretcher serves two purposes:  (1) to return the hat back to it's intended size; and (2) to render a perfect sweatband. 

What I've noticed is that when some sweatbands are sewn in, there is rippling in the band; the hat stretcher will eliminate this rippling.  So, what if you have a small, say cocktail hat that you've blocked over a form and you are having sweatband issues?  Force the hat back onto the block, and let it set for a while.  Sometimes you may want to add a little steam to the area, but this is not necessary most of the time.  What do you do if you've made a flat pattern hat and you are having issues.  Make a head size lift (collar); the lift will also work if you don't have a stretcher for a regular size hat, just force the hat over the appropriate lift size.  So it's always a good idea to have various sizes of headsize lifts in your millinery tool box.  Remember to pay attention to small details, such as a rippling sweatband, etc., in order that your hat is seen as a professional piece.

A Little More Work on My Top Hat

Remember last evening that I was draping damp buckram bias strips over a candle holder that I was using as a makeshift hat block for my top hat form.  Well  after it dried I gave it a nice hot dry ironing, and it came out almost perfect. What the dry (without steam) ironing did was to remove some of the bumpiness from the frame.  I will still mull (pad) it with another material in order to give the finished hat a richer appearance. 

The importance of the bias draping without pinning is that this process opens up an opportunity to use any object that you come across to use as a hat block, no matter what its shape is.  Please view my post on the Vase Hat to see how I completed the vase form.  I've refined the method more since this post, and I no longer remove the entire top of the form.

Anyway, once again good luck on the competition!


Tuesday, April 29, 2014

Oh No! Not Another Post on Millinery Buckram Foundation Material!

 
Hi all!  Rather than trying to figure out what to post next, I've decided to take advantage of some of the images I've taken over the past weeks and months.  So, I'll share with you the last buckram frame I made and once again give some of the reasons I think buckram is a great foundation material.  After all, it hasn't last a couple of hundred years because of its looks.  Lastly, I'll share a image of some of the last hat blocks I acquired.

Depending on when we entered into the millinery scene will determine our affection for and choice of millinery materials.  For me, it's buckram and finely woven parasisal (replaced with inferior grades).  For my millinery instructors it was willow, also referred to as espartre in some portions of the world. They spoke of willow as if they they were speaking of fine wine or exquisite diamonds.

When it comes to millinery foundation materials, my knowledge is limited to my exposure to it, including the successes I've had with it.  So here are a few reasons I prefer buckram over most other foundation materials:

It is a natural fiber:  So what's so good about buckram being made from natural fibers?  Well with the number of ladies I see fanning themselves these days, I think some of you know one reason.  Light natural materials breath and they allow you to breath.  Enough said.

It is light in weight:  One of my millinery teachers, Mrs. Eloise King, would always say that, "A hat should be as light as a feather."  Well buckram with its mesh construction delivers this lightness.

It is easy to sew through:  Although buckram frame edges are covered with crinoline (the fabric) or another thin bias cut material for the purpose of attaching fabrics to the frame, sewing through any portion of the frame proves to be an easy task.

It sticks to itself:  Now this is a big one!  Some don't realize this, or they do realize it but they don't take advantage of this property.  The reason I know it is because when it comes to those deep brims and concave crowns, some reach for the spray adhesive or some other type of adhesive.  Although this adhesive property does not work on all materials or for all situations, it works on the majority.  Further, you would only use this property depending on the fabric and the finished effect you would like to achieve.  I can't tell you the hell I would go through before I finally figured out how to take advantage of the buckram-sticky-thing when working with really deep cuff brims.  I'll also say that I absolutely hate when I see the underside of a hat brim falling and not hugging its underside (top or bottom), as if it was the lining falling from the top of an old 1954 Chevy.  I just want to shout, "WILL YOU FIX THAT THING!"  None of the hats here have any type of adhesive on them thanks to the flexibility of good old buckram.  I'm not against adhesives; they've always been used in millinery--yes even couture millinery.  I'm just not too fun of glue guns, but that's my issue..  

It can be used to construct flat patterned frames:  Not much explanation needed here, except that the frames can be as simple or as complex as needed to be.

It can be used to capture any hat block or object shape (molded frames):  Yes, any!  I mentioned this above.  The hat form (frame) to your right was molded over a wooden bowl.  It was used to construct the hat in my previous post.  You may also remember the post I made on the Draped Vase Hat.  The hat frame used for that hat was blocked over a ceramic vase, using one piece of buckram.  The frame to your right was constructed using multiple bias strips.  The way you construct your frame depends on your mood, your preference, and/or the type of fabric you use to cover your frame with, and it also depends on the complexity of the object you are constructing your frame on.
No matter what the shape is, you can always get buckram to conform to that shape.  You don't have to stitch it, and you don't even have to tie it down.  The frame above was neither stitched or tied down or pinned down.  However, you can secure the buckram if you feel you should.

It is affordable:  At 60 inches wide and coming in under $10 a yard, you can make many hats from one yard of buckram, depending on their sizes.  Remember the post "How Many Hats and Accessories Can You Make From One Yard of Fabric?"  Well, this also applies to buckram yardage.  The image to your right shows the hats I made for that post, and the video shows the accessories. By the way, all of the hats made in the video were blocked on wooden bowls, the black hat two bowls taped together to form a small crown and a brim.

If you don't live near a millinery store or ordering it over the Internet is not an option, and all you have is a fabric shop, you can you may be able find it in the upholstery section of your fabric shop, unsized; or you may be be able to find it amongst the tailoring fabrics in your fabric store, again unsized.  This means that you can size your own buckram.  If you can't find unsized buckram, one of the cotton upholstery or tailoring fabrics can be sized and used exactly in the same manner as millinery buckram if you don't have access to it.  But I will speak on this in another post.  We don't live in a perfect world so we must make the one we live in work for us.


I can go on about buckram, but I don't want to bore you.  It all depends on how well you master buckranm how much you will grow to like or dislike it.  No, buckram is not the latest kid on the block.  It's not sexy; but it works, and it works well.  If you don't like it, it's probably because you haven't learned to use it to its fullest extent.   Go out there and explore the many other alternatives to buckram if you have a desire to do so and find your best fit for your millinery era.  Just have fun doing it.

Last, I thought I'd share images of a few of my latest acquired hat blocks.  If you are a regular reader of this blog, you know how much I love a bargain.  Well one of my latest bargains was the acquisition of almost a dozen blocks.  Here are six of them.  I also found another mannequin head that matches my other display head, both coming from the Salvation Army.  The blocks came from one of Mrs Essie Edwards' farmer millinery students that was hanging her hat up for good.  No matter how many blocks I pick up, the majority of my blocking occurs on bowls or utility blocks.  So you see, millinery is a very affordable craft, depending on your choice of materials and equipment.